SuperFolder Terentatek
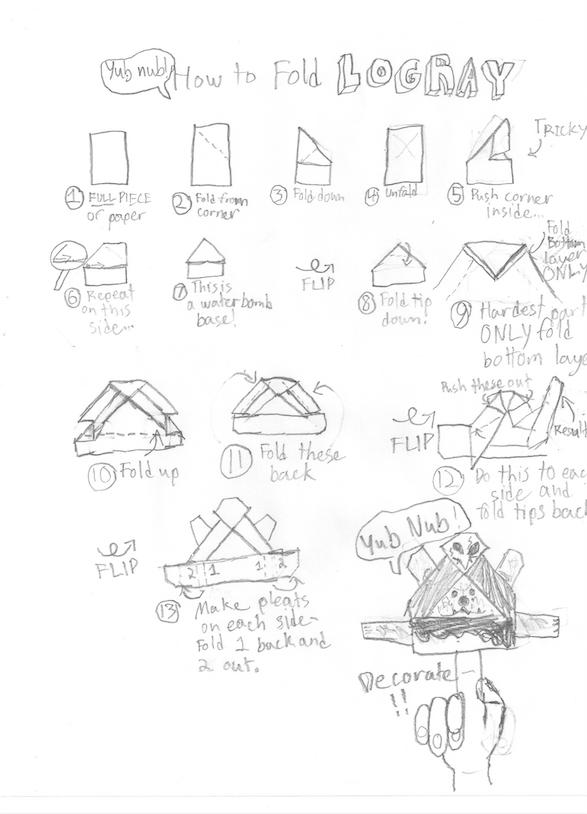
Here are the instructions for my Logray, which I posted a while back. If the words are hard to read, I’ve typed them below…
1) Start with a FULL piece of paper.
2) Fold the top right corner down, keeping it lined up so that the angle is a triangle.
3) Repeat on the other side. You should have a triangle with a rectangle at its base.
4) Unfold both corners…
5) See the creases in an “X” pattern? Take the bottom right corner of the “X” and push it inside… this part is tricky!
6) Do the same thing on the left.
7) What you should have now is a triangle over a rectangle with two flaps at the sides of the triangle.
FLIP THE PAPER
8) Fold the tip of the triangle down almost halfway…
9) This is the hardest part! On the upside-down triangle at the top (the tip you folded down) you’ll see that there are two layers on the sides. Push up on the top layer and fold the bottom layer down and under it. Do this to both sides.
10) You should have two points showing on either side and a shape that looks somewhat like a hood… Fold the bottom up. This fold can vary in size, depending on how big you want Logray’s head to be.
11) Fold the points sticking out back along the line at which they become visible to make a skull shape at the top of Logray’s head.
FLIP THE PAPER
12) Fold those flaps up (this will also fold another layer of paper below it) and fold the tips down. Now you have the ears! Rotate the very top (sideways triangles) out.
FLIP THE PAPER
13) The skull at the top of Logray’s head should be more separated at the sides now. Make a fold back where the paper at the bottom sticks out farthest, then fold it back near the same line. (This is a pleat.) That makes Logray’s arms.
14) Now decorate! Hope you enjoy!
P.S. YUB NUB!!!


